Review of China OEM Spinning Reel ( TA D0000 )
This is a review of a China OEM reel that I acquire from Aliexpress. I got 3 different size of these reels to have a look (1000, 3000 and 4000). The stripping and testing of the reel was done on the size 3000.
I paid $24.60 for the size 3000 and shipping was free. I got this reel from the following vendor in Aliexpress - https://a.aliexpress.com/_m00Sjjp . I notice that price on the vendor site do change occassionally, so do take note of that. I am not affiliated to the vendor, I am just telling you where I bought it, there is a few vendors on Aliexpress who are carrying the same models. So check it out if you're interested.
Out of the box the reel feels solid and pretty smooth. The reel was tested at Pasir Ris Main Pond, and it worked the same as a Shimano or Diawa $50-100 range reels. On the vendor site, it is listed that the reel has 14 + 1BB, not sure what that means but on the body i found 3 bearings at their standard location and 2 small ones on the line roller.
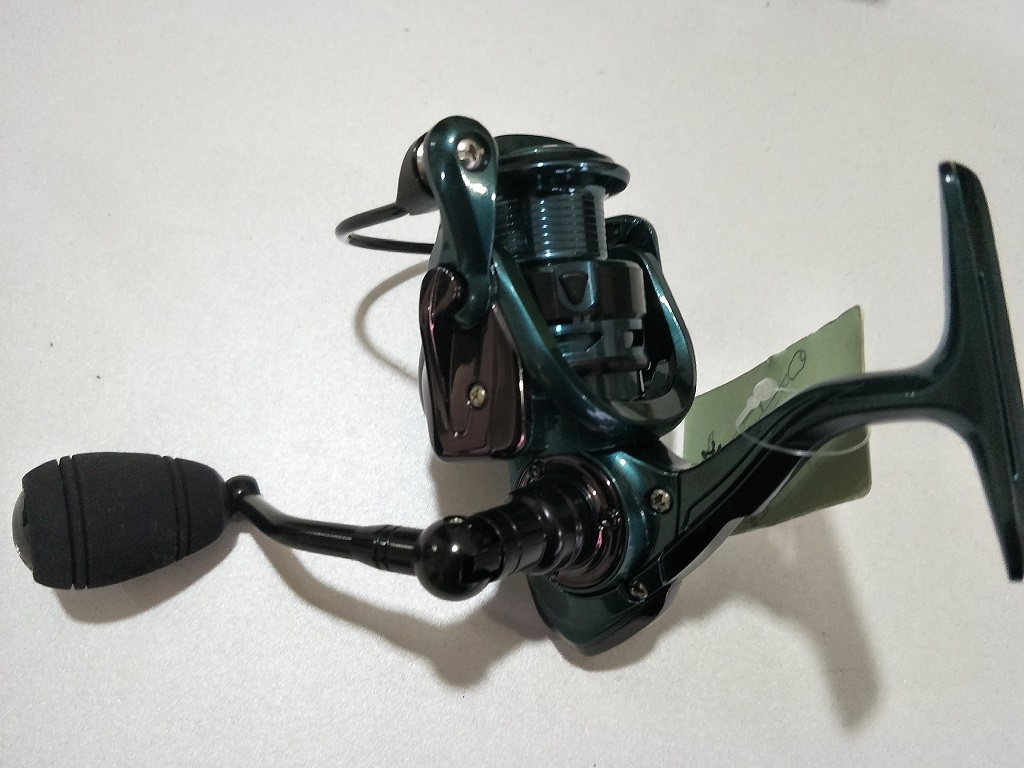
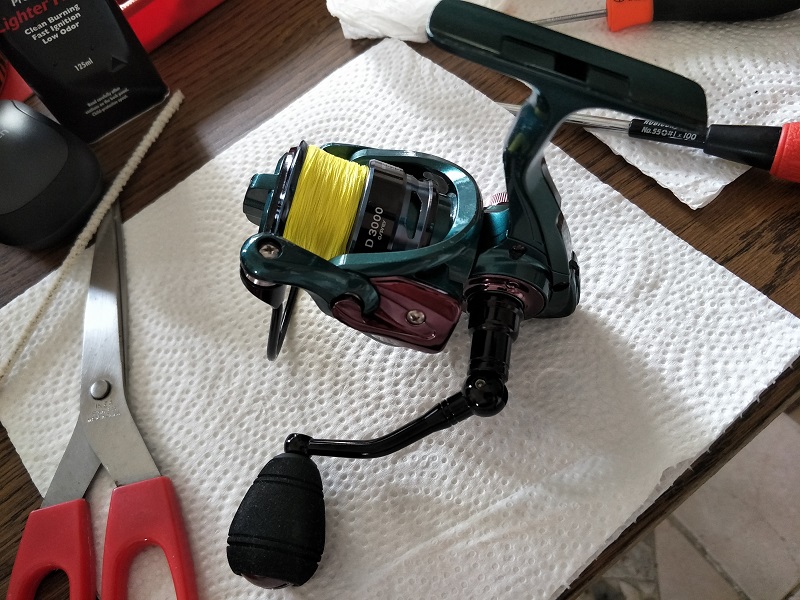
| Out of the box, a pretty standard looking reel. Eva handle, something not possible to find on a branded model at this price range.
The tag say "Quality Control" but in Chinese :).
This reel comes with a pretty interesting color scheme. Its teal and a darkish brown chrome. I personally like it a lot.
Here, I will give you a simple guide to take this reel apart so that you can learn to do simple maintenance when you need to. And more importantly to give the reel a little more lubricant where its needed. |
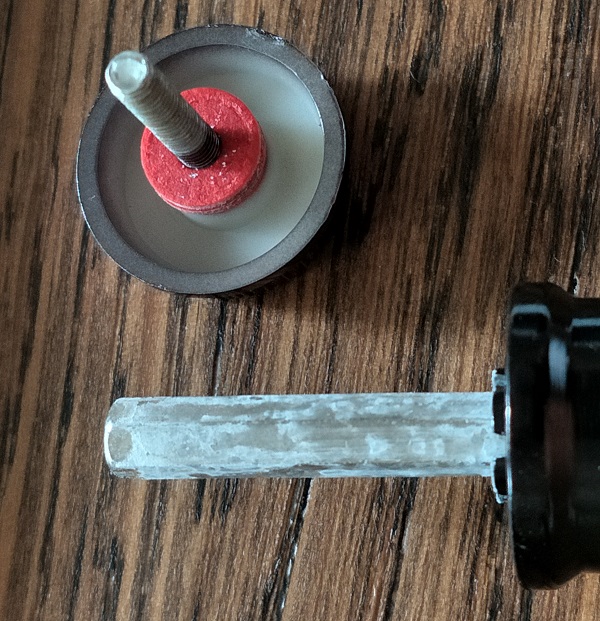
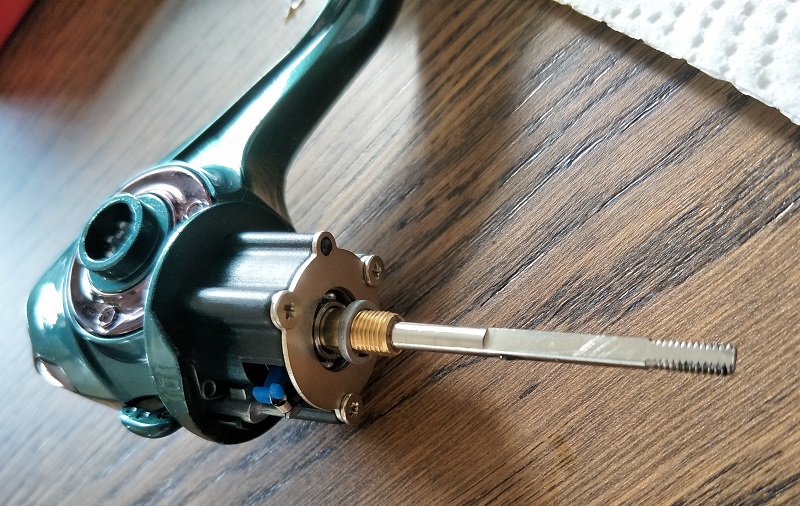
| After my first use at PRMP, I found that the line roller was producing some sound whenever I retrieve line.. So I decided that I would strip the reel and have a look inside. After washing the reel and drying it off for a few days, I removed the handle assembly to take a look. As you can see on the left, the drive shaft and screw is very dry and some oxidation seems to have already started. |
| A bit of oil on it and used some tissue paper to wipe the oxidation off from the surface. After that, brush on a thin layer of grease and its good as new. |
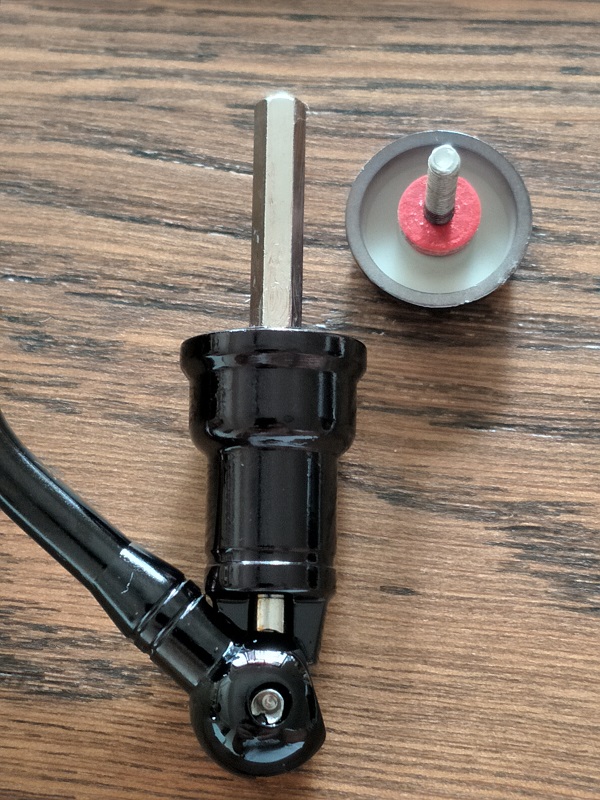
| A little oil onto this elbow and that's about all for the handle assembly. |
| The handle assembly done. |

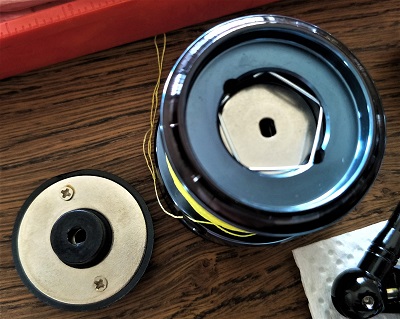
The next part to remove is the spool from the reel. Remove the drag knob and spool. The drag plate looks dry too, but we will fix that later. |
|
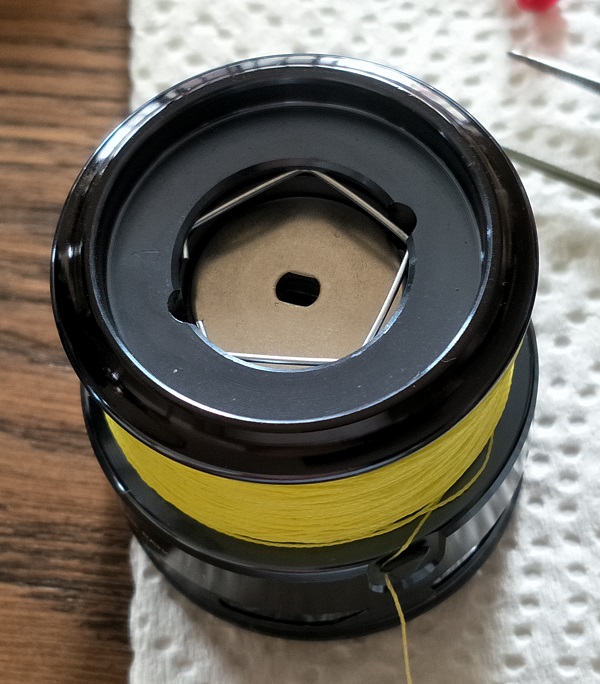
Everything is looks dry here. If you're following this make sure you don't lose the transparent spool washer. Dismantlement everything, by first removing the spool washer and the metal spool support. |
|

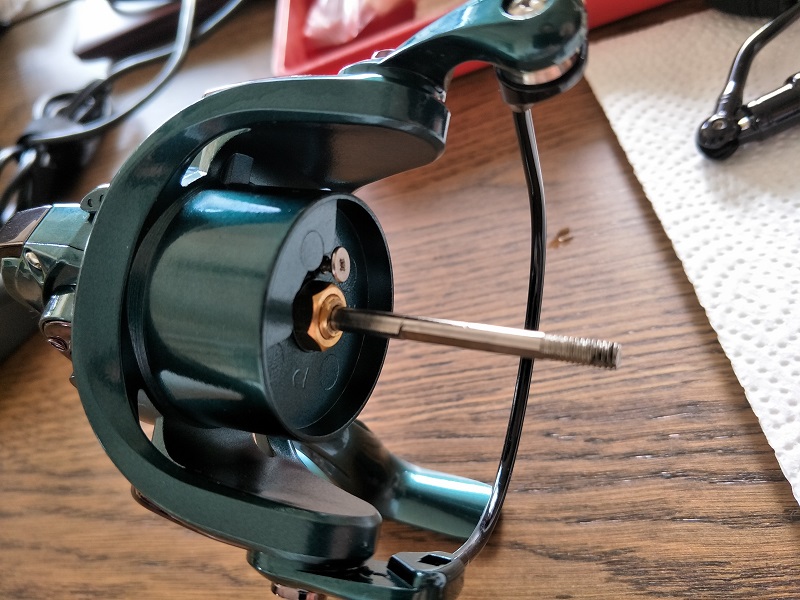
Then unscrew the screw that is securing the rotor nut. Only after removing the screw, that you can unscrew the rotor nut itself. After the rotor nut is removed, that will allow the Rotor to slide out from the main shaft. |
|
This is what it looks like after the rotor is remove. Note there is a metal washer on the screw thread of the brass pinon. Make sure you don't lose that. |
|
| Next, flip the reel around and remove the one screw holding the rear protector in place. |
| These should be the parts you should have at this stage. I have cycled the rear protector and the screw that we last remove. The rotor and the smaller parts removed before the rotor (is taken out), is displayed in order so that later it will be easier for me to remember the order to put them back. |
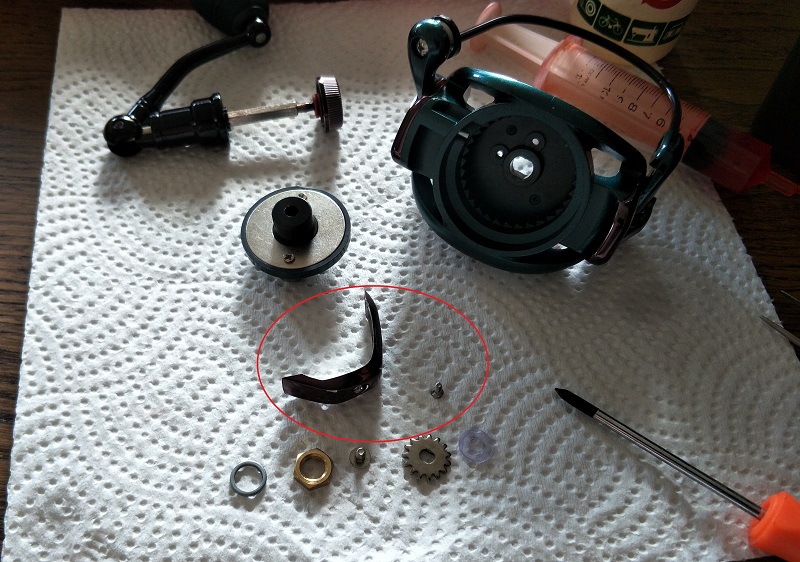
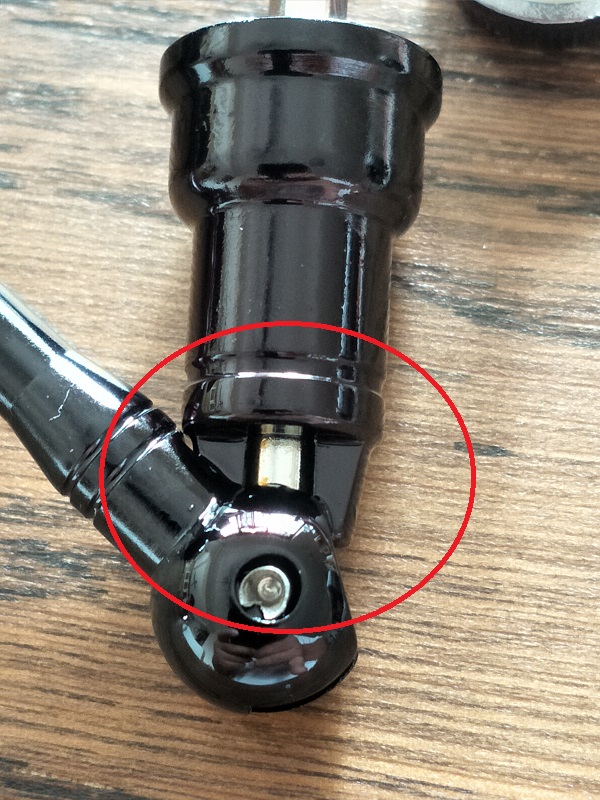
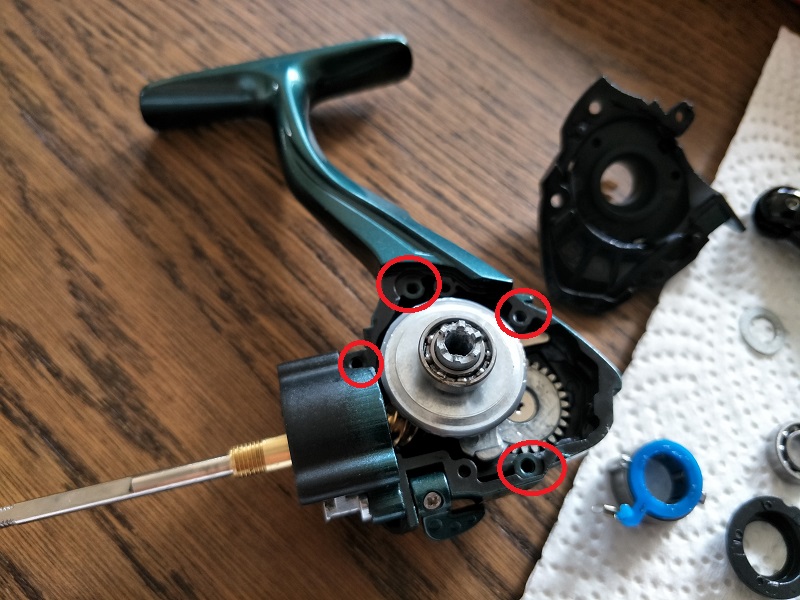
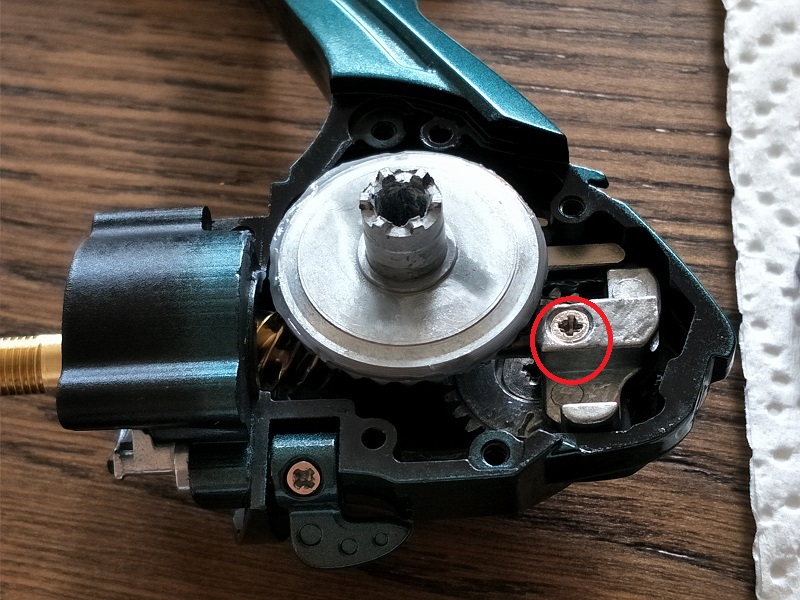
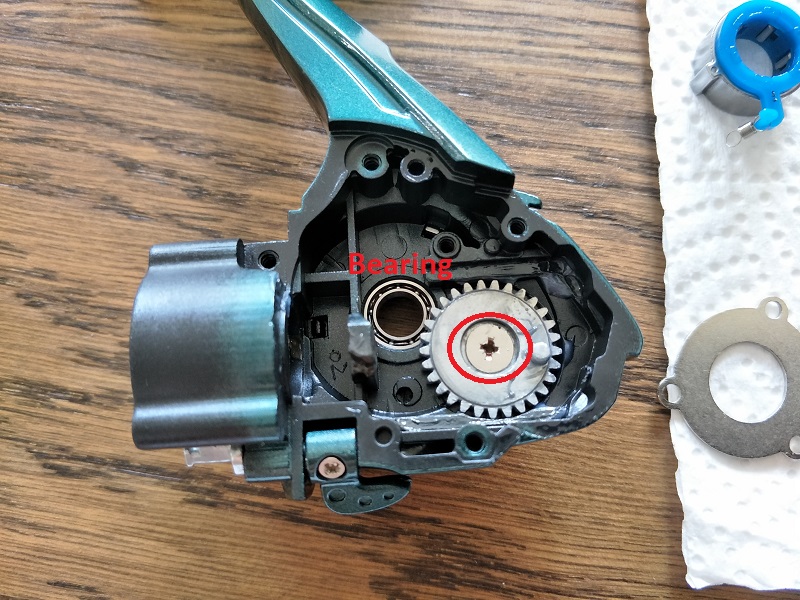
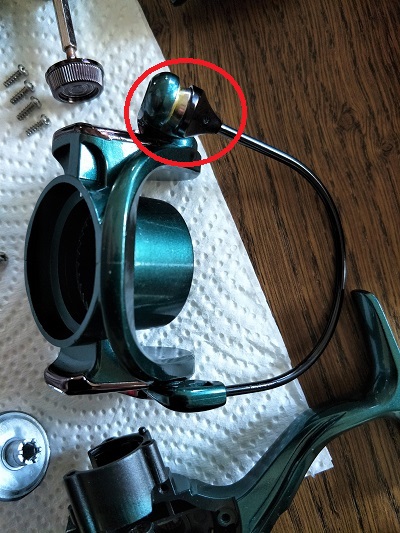
The next process is the simplest part of the whole dissembling process. BUT its the most scary and difficult process for me because the spring we are working on is very tiny, delicate and easy to lose (because it can jump away). SO BE VERY VERY CAREFUL HERE. You need to carefully use a pincer to loop the spring out from the sliver knob (anti reverse cam) that I have circle in red. Look at the second picture below this. Don't spoil or lose the spring.!!!! I am not sure if the vendor can replace it..! |
|

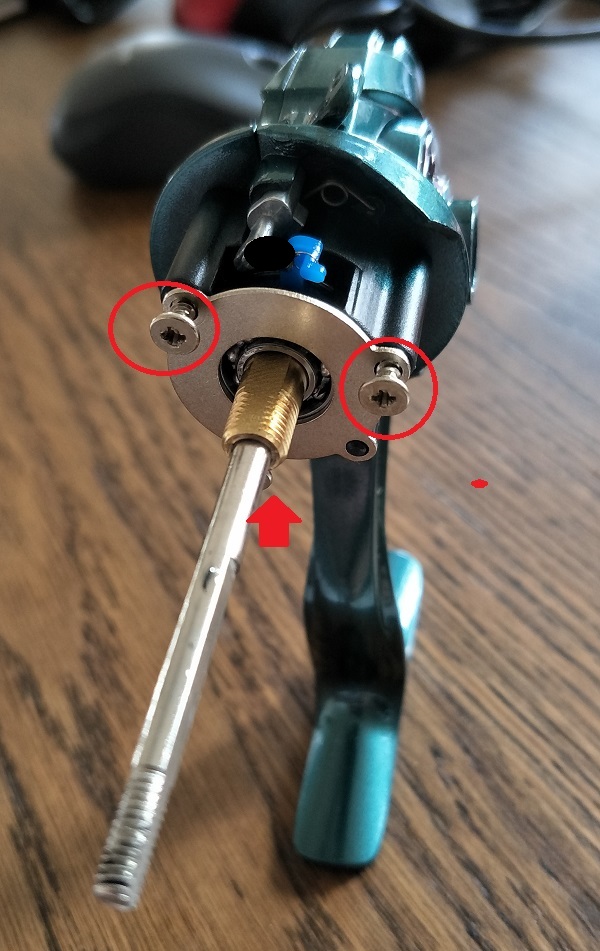
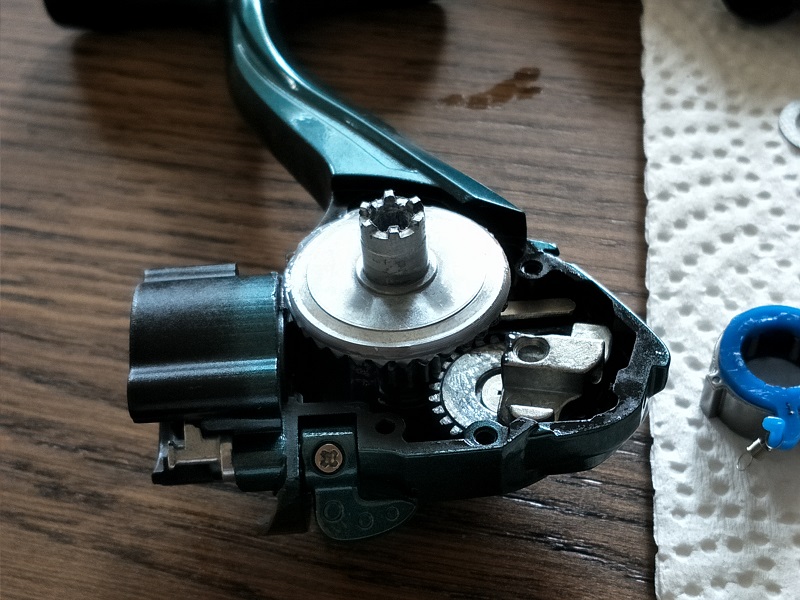
Next we need to remove the plate that is holding the One Way Roller Clutch Assembly in place. There are 3 screws hold the plate in place, you will need to remove them. |
|
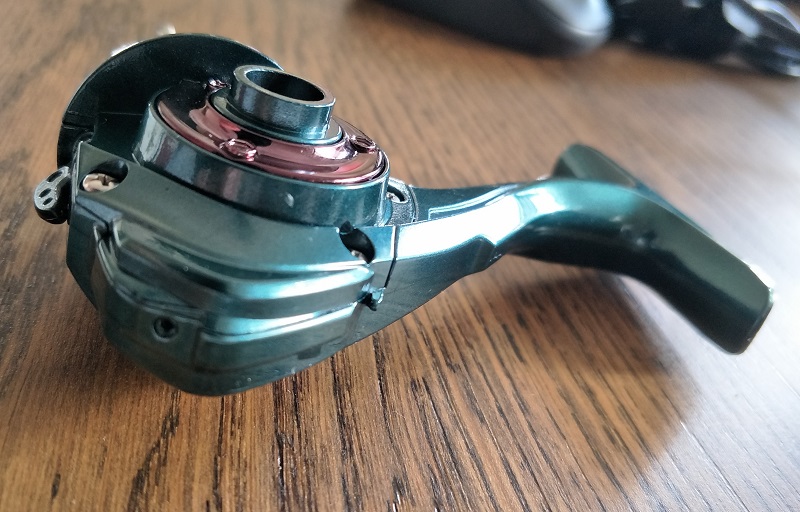
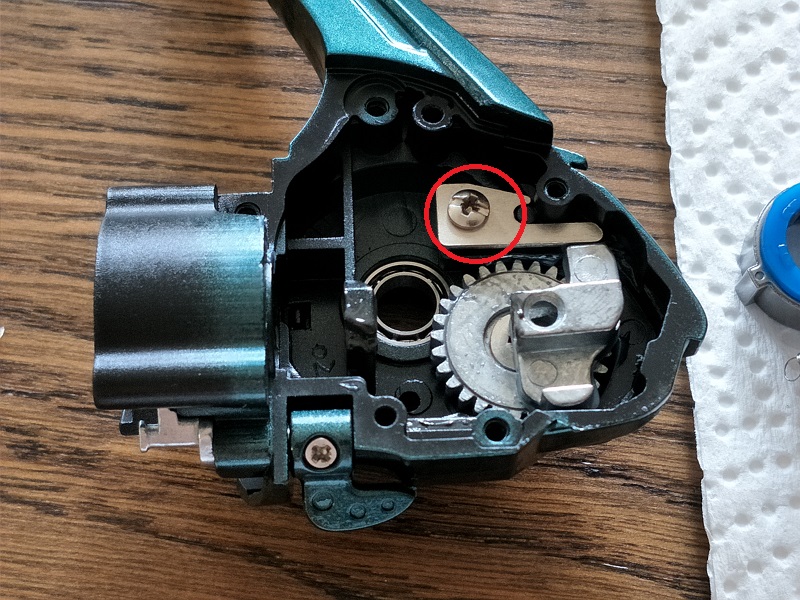
After removing the plate, you will see whats on the image on the right hand side.
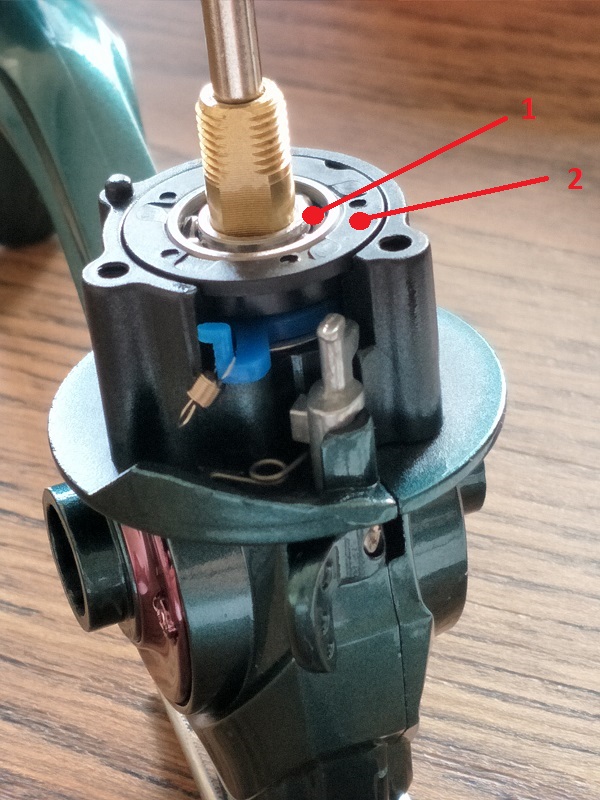
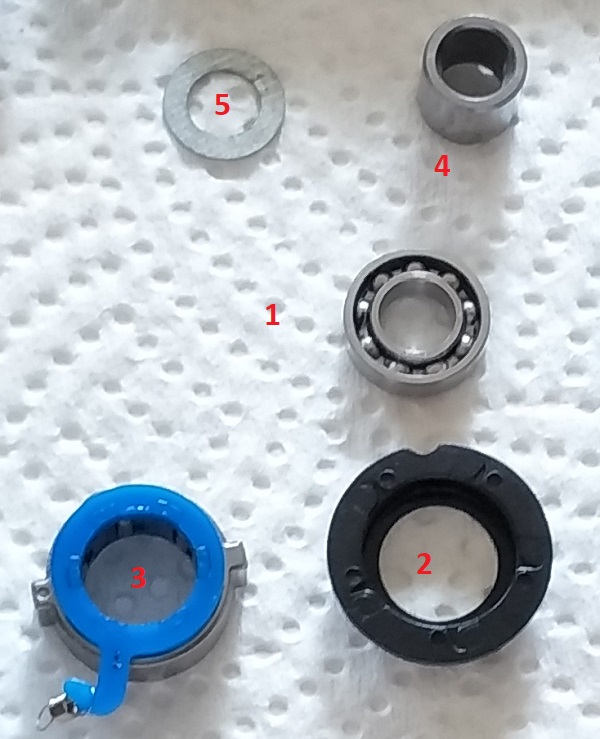
Slide the pinnon bearing out from the brass pinnon (1) . After that you can also slide out the plate (2) that's holding the one way clutch assembly. |
|
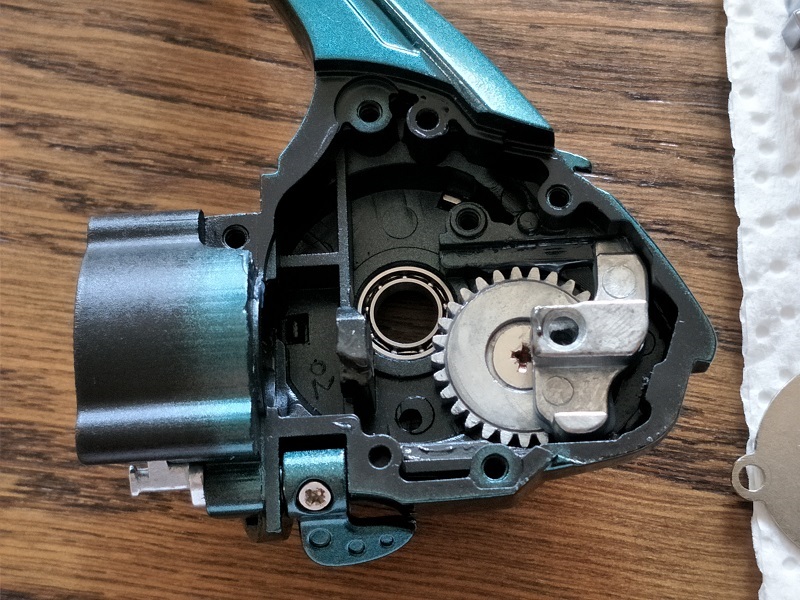
After that you should be able to slide out the clutch ring and clutch ring washer. |
|

1. Pinnon bearing. 2. Plate hold the one way clutch assembly. 3. One way clutch assembly. 4. Clutch Ring 5. Clutch Ring washer |
|
| Next to remove the body side plate. There is 4 screws holding the side plate to the main body of the reel. |
| The image on the left is what it should look like at this stage. |
| Next, we remove the drive gear ball bearing. The thing to note here is the shim between the ball bearing and the gear. This is very thin and easy to misplace. And also when you assemble back the reel, do remember to put it back or else you will feel that the gears have a slight rocking feeling when you wind.
If you notice there is also some metal filings on the ball bearing in the picture, this is bad news if they gets into your ball bearing. Remember to bush or wash them off. |
| Remove the Slider Retainer Screw. |
| Once done, you can slide out the main shaft together with the brass pinnon gear. |

| Next, lift up the drive gear. When you lift up the Drive Gear, check if there is any shim on the other side of the gear. If there is, keep and remember to put back the shim when assembling. |
| As you can see there is not much grease on the gear, that's the main reason why I advise people to open their reels to check.
The next piece we need to remove is the plate that hold the Oscillating Slider in place. I like this design, I don't see this in older model mid-lower range Shimano and Daiwa spinning reels. Once the screw is removed, you can lift the plate up. |
| And the Oscillating Sider is then free. Lift the Oscillating Slider off the Oscillating Gear. Note the knob, on the Oscillating Gear. When you assemble the reel later, make sure the Oscillating Slider seat neatly on this knob. |
| Lastly we need to unscrew the screw hold the Oscillating Gear to the body frame. Remove the screw and you can lift the Oscillating Gear off the body. The pop off the other drive gear ball bearing. |
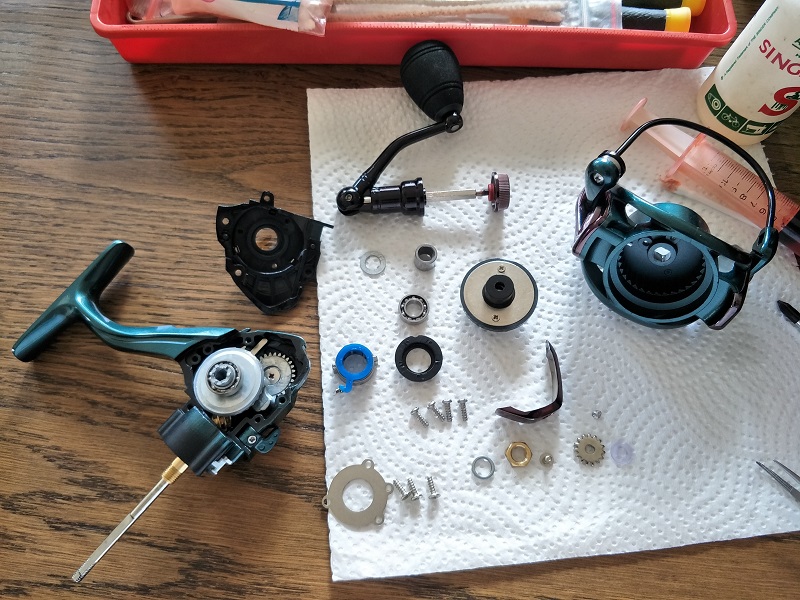
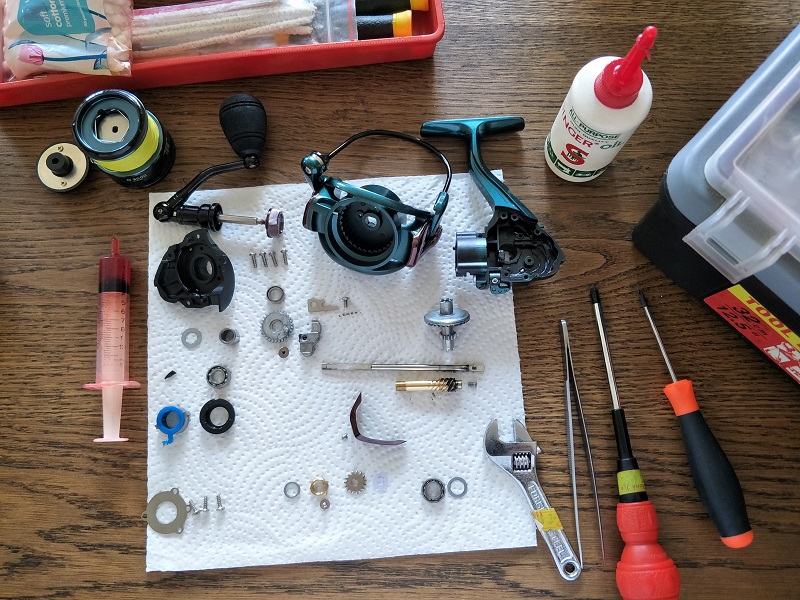
After stripping everything, these is what you will get.
One more thing to note, I think the drive gear bearings are off slightly different size, so don't mix them up. Normal for Shimano and Daiwa, they are usually the same, at least for the low to mid end model, I am not sure about the higher end ones. |
|
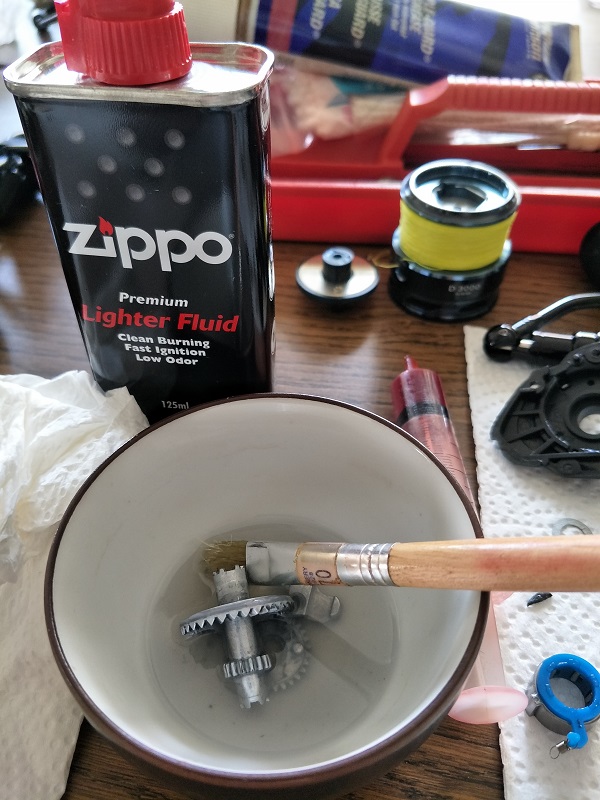
The items that I have circle in red, I will wash them in lighter fluid. For the body frame and body side plate, I will take a brush and brush the inside of the body plates with lighter fluid to remove the old grease if any. |
|

| For smaller parts, I drop them in a dish and wash them in lighter fluid. Same for bearings.
Remember to dry these part as much as you can after you wash them. I usually leave them aside for one day or two after drying them. This is so that the lighter fluid in the ball bearing can evaporate. If you can't wait that long, you can take a hair dryer and blow them or....... burn them with a lighter (I don't like this method as I think the soot might defeat the purpose of cleaning the ball bearing).
The ball bearings need to be dry of the lighter fluid because you need to oil the ball bearings before assembly and lighter fluid will break down the oil if there are any lighter fluid left inside the bearing. |
For holes and tube, I use a gas pipe cleaner. The same one we use to clean rifles in the army. I got mine from the army shop, the original use for this thing is to clean smoking pipe. So if you're not from Singapore, you can got to a pipe shop where they sells pipes for smoking tobacco and ask them. Of course if you have a gun shop near you, you can also get it from them too.
Before assembling, I will give all this parts a very thin coat of grease all round (waterproof protection) and a slightly thicker coat on places that contact (where the teeth meets) other parts.
But do not coat too thick a layer too. Because it not only makes the gear sticky and harder to turn initially, it might also run off or leak out and make the reel messy and greasy to hold. |
|
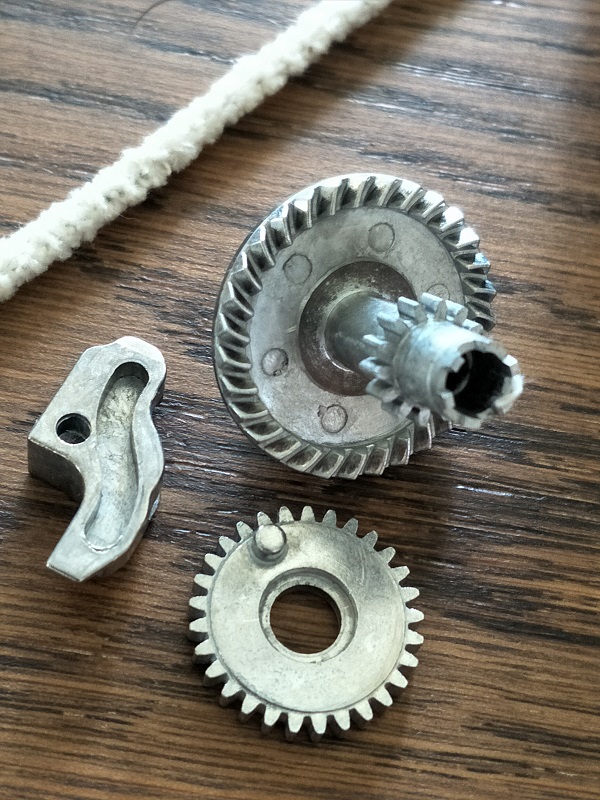
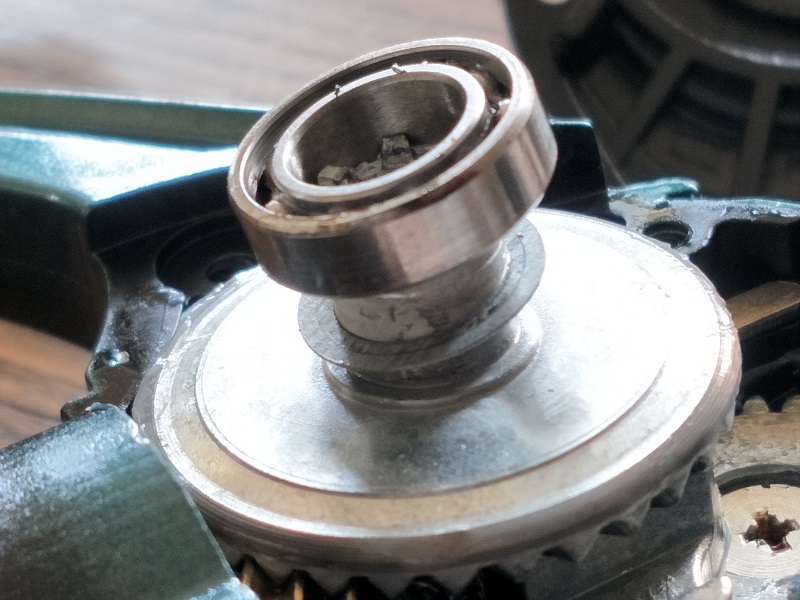
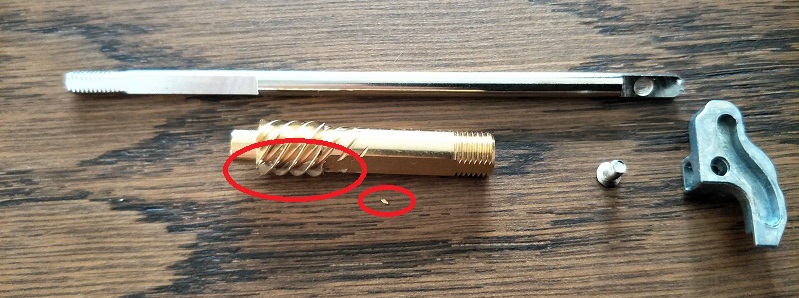
| This is how it looks after the main shaft, brass pinnon gear and the Oscillating Slider has been de-greased.
I have circled a brass filing in the picture, it came off from the brass thread on the pinnon gear, seems like quality control wasn't very good.
I oil the shaft so that the pinnon can slide smooth on it and i greased the thread on the pinnon and grove on the Oscillating Slider. |
| After you have oiled and greased the part, just reverse the process and assemble everything back, make sure you don't miss any parts. |
I will do another separate section on how the open and clean the bail arm assembly. |
|
| And also another on how to take out the drag pads to clean and maintain them.
Because this section is already too long :D. |